Posts in this series:
- Part 1 : introduction
- Part 2 : the database server
- Part 3 : the Analysis Services server
- Part 4 : the Reporting Services server
- Part 5 : the Sharepoint server
- Part 6 : the TeamFoundation Server server
- Part 7 : the TeamBuild server
In this fifth post we will see what to do to rename the TeamFoundation Server server tfs.demo.local to tfs1.demo.local and make our service work again ![]()
TeamFoundation Server
First you need to rename the server ![]()
We can then reconfigure the Application Tier using the administration console:
- Start the admin console.
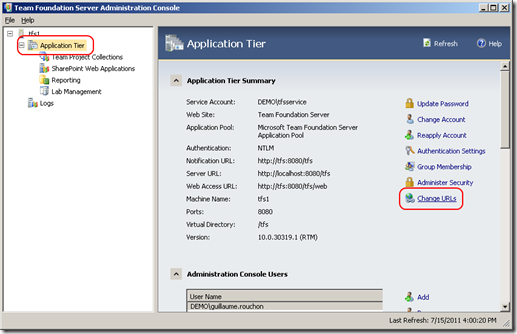
- Select the Application Tier node and click the Change URLs link:
- In the dialog window, update the Notification URL field with the new TFS server address:
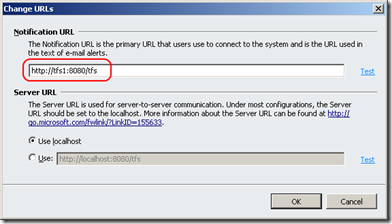
- Click the OK button.
If you prefer to use command line tools, you can use the TfsConfig:
- Open a command prompt.
- Run the following command to update the notification url in TFS:
"%programfiles%\Microsoft Team Foundation Server 2010\Tools\tfsconfig" settings /notificationurl:http://tfs1:8080/tfs
That’s it for the Application Tier part. We must now reconnect the TFS Sharepoint extensions.
Sharepoint
On the Sharepoint server we will reconfigure the TFS extensions for Sharepoint by using the TFS administration console:
- Start the admin console.
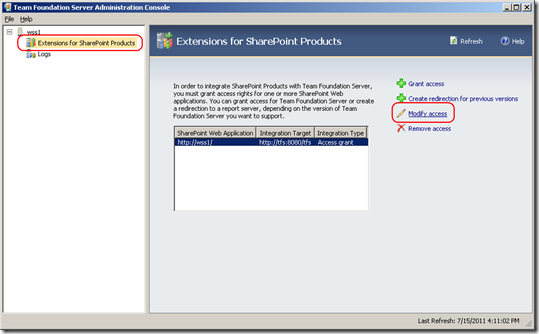
- Select the Extensions for Sharepoint Products node and click the Modify access link:
- In the dialog window, update the URL for Team Foundation Server field with the new address:
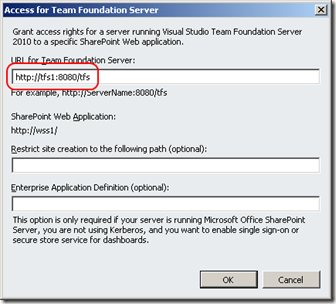
- Click OK.
That’s all for Sharepoint but now you must update it’s content.
Office Documents
If you have Excel or Project files in your Sharepoint document library that use the Team Explorer add-in to connect to TFS, you will need to update those files. Here is what to do for all your Team Projects using the Agile process template:
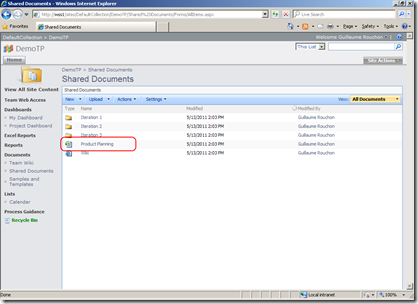
- Open the Product Planning document for editing:
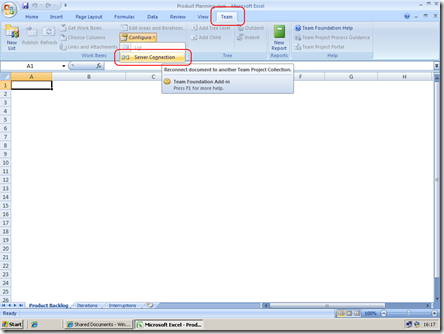
- In the Team tab, click on Configure and select Server Connection :
- In the dialog window, click on Servers to add the server using it’s new URL.
- When the connection is create, select the server and the correct Team Project :
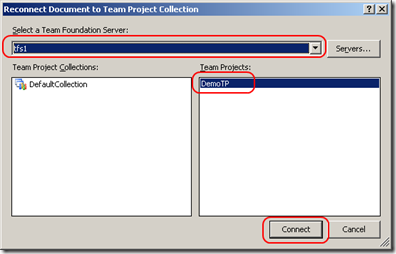
- Click on Connect.
- Redo steps 2 to 4 for every document. (yes this can be long… :))
Your documents are now reconnected. Note that you must also update the Visual Studio connection but i think everyone knows how to do this ![]()
TeamBuild
The last component to update is the build service. For this we must use the TFS admin console:
- On the build server, start the admin console.
- Select the Build Configuration node and click the Properties link:
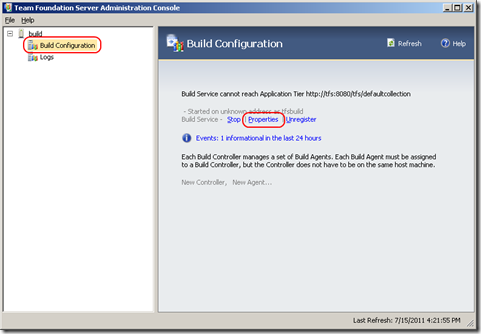
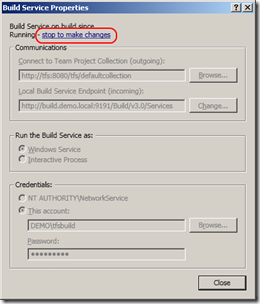
- In the dialog window, if the service is started you must first stop it using the stop to make changes link:
- You can now update the Connect to Team Project Collection (outgoing) field with the new url:
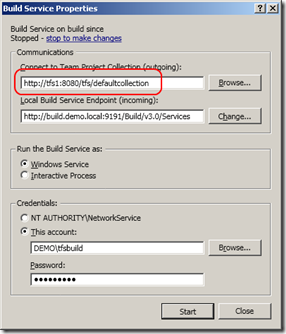
- Click Start to restart the build service.
- Open the registry editor (regedit).
- Go to HKLM\SOFTWARE\Microsoft\VisualStudio\10.0\TeamFoundation\Build\ServiceHost.
- Update the ApplicationServerUrl value with the new URL.
- Restart the build service.
Your installion is back online using the new TFS server name. LNext time will rename the TeamBuild server.
Carpe Diem.
